Showing posts with label rust dyeing. Show all posts

Tuesday, March 16, 2010

3 Pretty Sisters

I’m finally able to post my entry for the Cloth, Paper, Scissors magazine Readers Challenge- ‘Make it Pretty’! I checked their website today and the finalists are listed. -not me, but CONGRATULATIONS to all the finalists and I can’t wait to see all the finished mixed media artwork in the magazine!

Here are 3 sisters; each pretty in their own way.
I admire women who are strong and have a sense of self; who love themselves as they are. There is often a rivalry between sisters and friends as to who is the ‘pretty one’ or the ‘clever one’. These three sisters shine in their own way; they are happy to be different and happy to be themselves.

The Three Sisters
Mini Art Quilt
12" x12" (30cm x 30cm)

My inspiration is a dream-time aboriginal story that explains the natural rock formation known as ‘The Three Sisters’ at Katoomba in the Blue Mountains, west of Sydney, Australia. This is the version I like best although the other does include a Bunyip! The three beautiful sisters fell in love with 3 brothers from another tribe to whom it was against tribal law to marry. The brothers decided to steal them away and a battle ensued. The 3 sisters were turned to stone for their own safety by a tribal elder (some say it was their witch doctor father) - but he died in the battle and they couldn’t be turned back. Even as stone, they are still beautiful……………………


The Three Sisters - detail
Mini Art Quilt
12" x12" (30cm x 30cm)


The Three Sisters - detail
Mini Art Quilt
12" x12" (30cm x 30cm)

Beauty is so much more than skin deep; I believe beauty is in the eye of the beholder and that we are all pretty whether we are tall or short, plump or thin, have blue, brown, green, grey, or hazel eyes; whatever our skin colour, or age. Sometimes it’s on the surface, sometimes deeper down.

“People are like stained-glass windows. They sparkle and shine when the sun is out, but when the darkness sets in; their true beauty is revealed only if there is a light from within.”
Elisabeth Kubler-Ross

Methods and Materials:

The background is thin printed cotton muslin over red and white polka dot cotton. The dots were visible through the muslin and daisies were embroidered around alternate polka dots with a variegated perle thread and leaves with 3 strands of embroidery floss.

The sisters’ faces were painted onto a piece of onion dyed silk with fabric paint, acrylic paint and textile medium. The circular faces were cut from the silk and needle turn appliquéd to their halo collars which were made of rust dyed silk and muslin. Buttonhole and Running stitch were used to embellish the haloes. The faces were slit from behind and stuffed with wadding.

The sisters’ dresses were made from various pieces of sari silks and cottons. Running stitch was used to outline design elements and attach the pieces to the background. Various novelty fringing/yarns were attached to the sisters’ halo collars as they were stitched to the background. Other embellishments include a piece of hand dyed vintage lace, and a piece of rust dyed corded silk (under the lace).

The quilt consists of wool batting and commercially printed cotton backing. Binding was made from silk, commercially printed cotton and sari cottons.

Most of the fabrics were in my stash; but the beautiful embellished sari silks and cottons were purchased from Manasi's etsy store:Yarnahoy.
Feb 2010


Please go and check out Yarnahoy's store- Manasi has some beautiful fabrics (and rovings) and gives a generous 20% discount on future purchases if you blog about what you made with fabric purchased from her! There are other ways to earn a discount too.... ( I've just received another bundle of scrap sari fabrics from her and they are truely delicious!) She has just returned from a trip to India, so will have lots of new and tempting fabrics for your textile art!

Saturday, February 20, 2010

of Slow February Progress............

So, here I am at the end of my second working week… feeling as if I’ve achieved, well, not a whole lot! I miss stitching, I miss blogging, I miss being able to do just what I want, when I want to! I don’t know how so many of you juggle a day job with creativity! I do enjoy my job though...... just need to learn to balance it all.

I’ve speedily read the blogs I keep up with (sorry, I haven’t left comments!), and tried to do at least a little hand stitching each evening….. Once I’ve caught up with the dreaded housework this weekend I intend to work on some things here in the studio…. I can't wait!


Hand dyed muslin, silk and linen...

This little piece is from my last dye batch. I'm not planning at all, just using scraps and small pieces and stitching to keep me sane...

Hand dyed vintage lace on rust dyed silks and muslin

This piece started life as part of a challenge but I didn't end up using it. I have more stitching to add; I'll out line the Rose with split stitch and possibly the leaves too. The background is machine pieced.


Hand pieced and quilted commercial printed cotton

This little block is all hand pieced from my scrap bag. I haven't done any hand piecing since the Really Ancient Cloth in my last post! (About 100 years ago!)

Thanks Marie at Ancient Cloth for the link to my Green Eyed Dragon! and to Catherine at Emergence for her link too. They are both doing some amazing work and experimentation!


Saturday, December 5, 2009

Of Rust and Earth and Sacred Symbols

Here is a sneak peak at a couple of things I am working on at the moment....

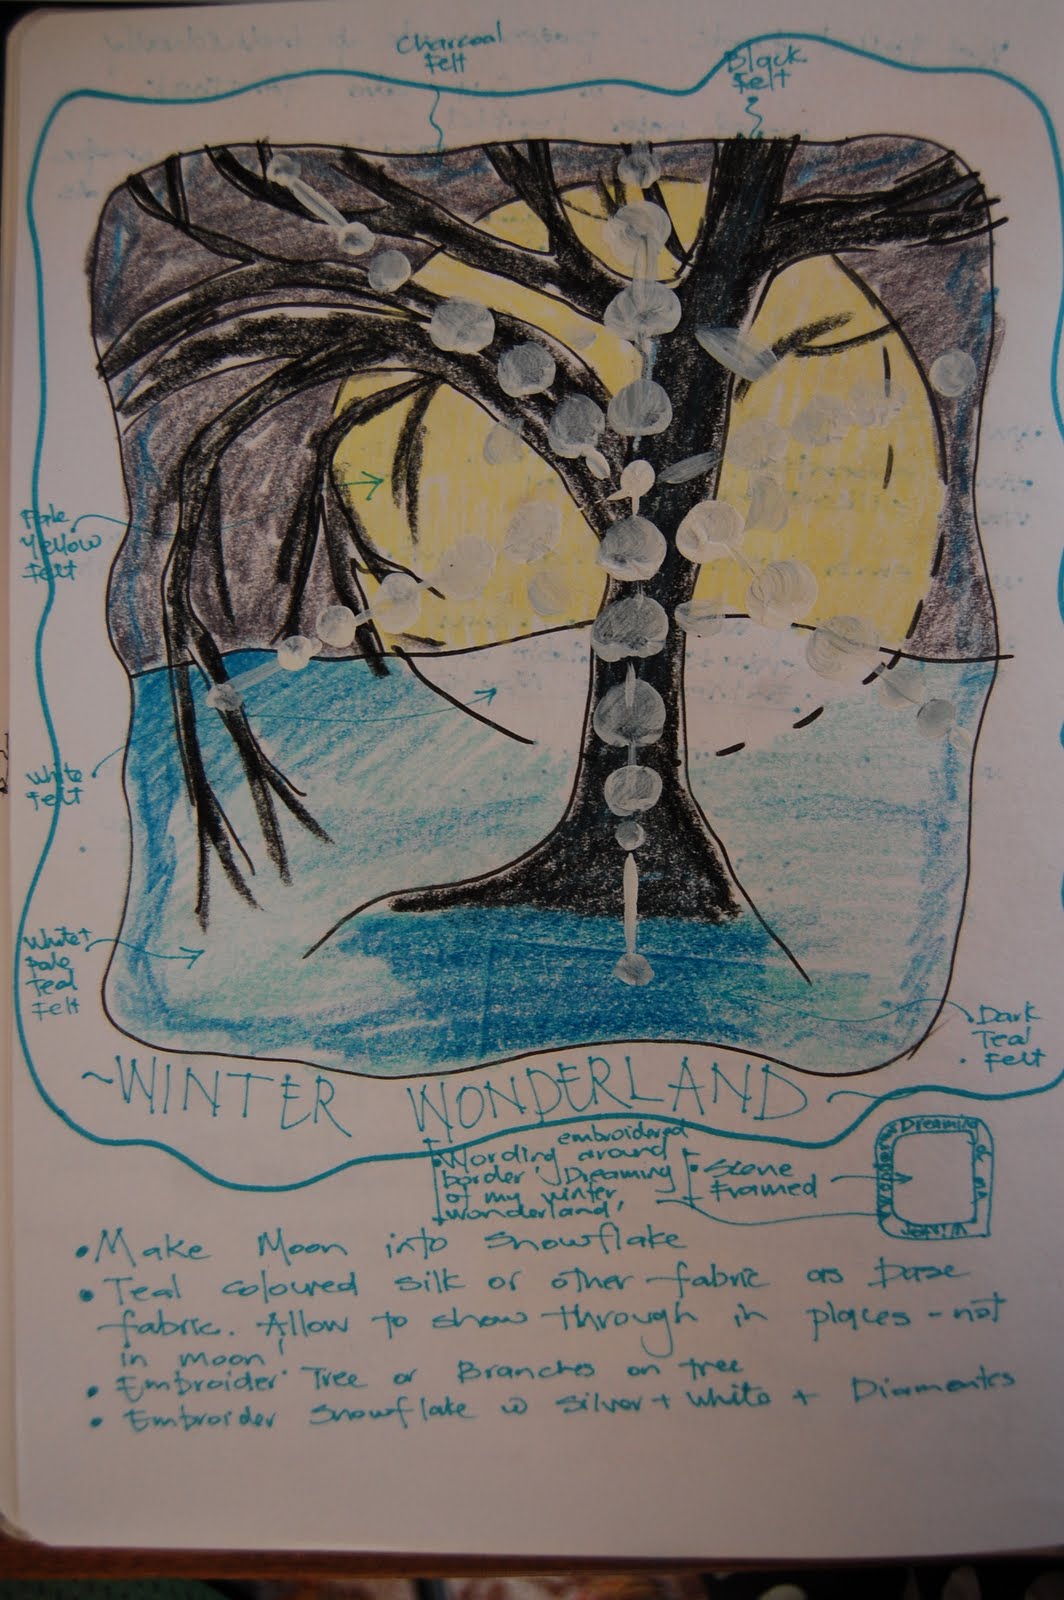
Winter Wonderland
I mentioned in my last post that I am entering a Winter Wonderland themed Exhibition at Hand Embroiderer's Network. I'm gradually building up some surface embroidery on the felt design, including couching a fluffy novelty yarn around the edges.

Couching and Running Stitch
Winter Wonderland WIP

Mother Earth Art Doll
This is another challenge I am going to enter, but I need to work quickly because the deadline for photos is the 18th December! Yeek! It is a Cloth Paper Scissors Reader Challenge to create one mixed-media art doll representing Mother Earth. I have two versions on the go and will choose my favourite upon completion! Nothing like amping up the pressure on oneself!

Version one is plain cotton that has been rust dyed with sacred symbols; I think I may still be adding some embroidery.


Mother Earth Art Doll
Rust Dyed Sacred Symbol WIP


Mother Earth Art Doll
Ooops, sideways photo but you get the idea!
Painted facial features (lips) and rust dyed markings. WIP

Version 2 is using some leftovers of the discharge dyed fabirc that I used for my first Quilts 4 London pennant and a similar technique....


Mother Earth Art Doll- WIP
Discharge Dyed, Fabric Paint and Embroidery

Rusting
Here is an old embossed book cover that I rusted. I'm so pleased with how it turned out! I'll eventually use it in a mixed media piece............ but for now it is sitting on the mantlepiece in my studio!


Rusted Book Cover

Saturday, November 28, 2009

Aboriginal Circles

I'm so excited to have finished the first of my pennants for Quilts 4 London.... that I've just started another!

I have some small pieces of contemporary aboriginal design cotton fabric which I am making into individual circle quilts about 2 " diameter. They have a plain coloured back and wool batting inside and I will quilt them individually! Then I'll slip stitch them together and join the many circles together by hand also -into a pennant shape!

Quilts 4 London Pennant #2
left:front, back and wool batting inner
right: completed circle minus quilting


That's the theory anyway! I've made 2 circles to date. I'm not sure at this stage if I will join them randomly or more likely into rows....I blogged quite recently about a circle quilt that I was going to do for the Bunbury Quilt Challenge. (I haven't actually started that yet but I'm stealing my design idea for this more managable sized project!)

I had fun making felt again today. It was supposed to be nuno felt but the beautiful peacock blue silk I used as the base fabric was too finely woven so I didn't get the lovely bubbly effect I did on my previous piece. (It's good to experiment, right?) Still, I 'm happy with the design (It's for an online challenge at Hand Embroidery Network . The challenge theme is Winter Wonderland) It's turned out pretty well exactly as I designed it in my sketchbook. Now I'll be embellishing it with embroidery.....


Sketchbook design
Wool fibres laid out ready to felt


Fibres wetted and felting process started


Felted and embroidery embellishment started

I just love the uneven edges. I added glitter to the fibre before felting and was going to embroider a huge snowflake over the entire scene but I'm not so sure about that now.

I've been playing with a few other things too (as usual!)

Here is a piece of rusted watercolour paper which I am very pleased with. I want to stitch or draw into the image.....


Rusted Paper

I dyed these scraps of fabric and I think they work perfectly with these pieces of hand dyed lace I was gifted from my ex MIL many years ago!


Hand dyed fabric and lace

I want to apologise for the links not working on my blog. Even the one's that were working don't seem to be working now! I've tried to edit posts and fix the problem but I'm not sure what I'm doing wrong! It seems to be a basic and simple thing to add a link but they just aren't linking through to the websites. Any hints will be gratefully accepted!

Friday, September 11, 2009

Rust Dyeing Fabric

This has been my latest fascination and I’ve been having so much fun! Plus, it's so easy!
It’s amazing what you find in a farm shed! I wet the fabric in a solution of ½ vinegar and ½ water; squeeze out the excess and then wrap the fabric around the rusted items; put the whole lot in a plastic bag (or wrap the whole lot in plastic sheeting) for larger items. I’ve been sitting the whole lot on the sink in my studio which gets a lot of morning sun. Most of these pieces were dyed overnight.


Rust Dye Sample Pieces

This photo shows a selection of pieces; at the top a piece of coloured thai silk which only took on minimal colour; From left to right 1) a piece of silk (?) which took on the shapes of an old cog beautifully! 2)another piece of silk which took on a grey colour with rust marks too 3) a commercially dyed cotton which also took on the cog shape and 4) a plain coloured cotton which took on minimal colour. I have just read somewhere about preparing the fabric first so it takes on even more colour! I'll try that next.


Rust Dye on Silk Detail

L) Silk cog-back
R) Cotton cog - back


Cotton Muslin with Grate Rust


I love the process and absolutely am in love with the results! I love that the fronts are almost outlines of the shapes and the backs are more solid. This is especially noticeable on the cog pieces. I want to do more..............

LinkWithin

Related Posts with Thumbnails